

Creating a Smooth First-Person Mouse Look System
You’ve successfully scripted a crisp, responsive 3D player controller that utilizes the CharacterController component to walk in any direction relative to where they face. However, right now, your player is locked looking in a single direction. To turn this into a true first-person or third-person experience, we need to bind the mouse movement to the camera’s rotation.
Since your main camera is already set up as a child of the player GameObject, we can implement standard shooter mechanics: mouse movement left and right will rotate the entire player body, while mouse movement up and down will tilt only the camera.
🛠️ The Core Logic: How It Works
To create a clean, professional mouse look system, the logic splits into two distinct tracking angles:
- Horizontal Rotation (Y-Axis Turn): When the player moves the mouse left or right, we rotate the entire player GameObject around its up axis (
Vector3.up). Because the camera is a child of the player, it automatically turns with the body. - Vertical Rotation (X-Axis Look): When moving the mouse up or down, we only want to tilt the camera mesh. If you tilt the entire player body forward or backward, your character model would trip into the floor geometry!
- Clamping the Vertical View: To prevent the player from flipping the camera upside down when looking too far up or down, we use
Mathf.Clamp()to limit the vertical rotation angle strictly between $-90$ and $90$ degrees. - Locking the Hardware Cursor: A standard operating system cursor drifting across the screen breaks immersion and clicks off the game window. We lock the hardware cursor to the dead center of the game viewport workspace screen and make it invisible.
Step 1: Writing the C# Mouse Look Script
Create a brand new C# script inside your project workspace directory, name it exactly MouseLook, and attach it directly to your Main Camera (which is sitting inside your player object hierarchy). Paste the following production code inside:
C#
using UnityEngine;

public class MouseLook : MonoBehaviour
{
    [Header("Sensitivity Settings")]
    [Tooltip("Adjusts how fast the camera moves with your mouse cursor.")]
    [SerializeField] private float mouseSensitivity = 500f;

    [Header("Target Body Reference")]
    [Tooltip("Drag the parent Player GameObject transform layout into this slot.")]
    [SerializeField] private Transform playerBody;

    private float xRotation = 0f;

    // Start is called before the first frame update
    void Start()
    {
        // Lock the hardware cursor to the center of the game screen overlay window
        Cursor.lockState = CursorLockMode.Locked;
        // Make the cursor invisible so it doesn't clutter up the gameplay view
        Cursor.visible = false;
    }

    // Update is called once per frame. Perfect for receiving look inputs.
    void Update()
    {
        // Gather raw mouse movement axis deltas
        // Time.deltaTime ensures look speed feels identical regardless of your frame rate
        float mouseX = Input.GetAxis("Mouse X") * mouseSensitivity * Time.deltaTime;
        float mouseY = Input.GetAxis("Mouse Y") * mouseSensitivity * Time.deltaTime;

        // Decrease or increase the look tracker angle based on vertical mouse data
        xRotation -= mouseY;

        // CRITICAL: Clamp the rotation so the player cannot flip their head upside down!
        xRotation = Mathf.Clamp(xRotation, -90f, 90f);

        // Apply local rotation coordinates exclusively to the camera for looking up/down
        transform.localRotation = Quaternion.Euler(xRotation, 0f, 0f);

        // Rotate the entire player body transform left and right based on horizontal mouse movement
        playerBody.Rotate(Vector3.up * mouseX);
    }
}
Step 2: Hooking Up the References in the Inspector
Configuring this inside your active design editor workspace window takes only three quick steps:
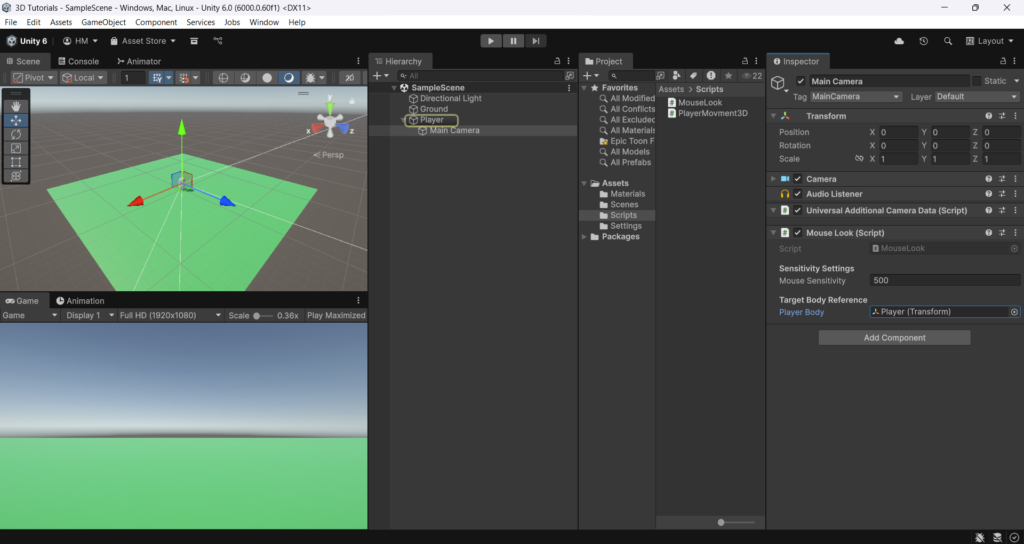
- Select your Main Camera (the one nested as a child inside your Player capsule object).
- Drag and drop your newly created
MouseLookscript component directly into the camera’s Inspector panel. - Locate the parent Player capsule GameObject from the Hierarchy view, drag it over, and drop it directly into the script’s Player Body field slot in the Inspector.
Hit Play, click inside your game window screen, and move your mouse. Your character will now turn organically toward your pointer paths with total structural flexibility!
⚠️ Common Pitfalls to Avoid
- The Inverted Look Axis Mistake: If your camera tilts down when you move the mouse up, look at the script line:
xRotation -= mouseY;. Beginners often accidentally write this with a plus sign (+=). It must remain a subtraction because moving the mouse upward increases positive coordinate data, but tilting a camera upward requires a negative rotation adjustment around Unity’s internal X-axis matrix! - The Glitched Escape Key (Unlocking the Mouse): Because the script completely locks your mouse cursor into the game screen layout, you won’t be able to click on your editor buttons while playing. Simply press the
Esckey on your keyboard at any time while testing inside the Unity editor to temporarily free your hardware cursor mouse pointer.
Wrap Up
Adding an immersive first-person look layout instantly transitions your basic 3D movement mechanics into a fully realized gameplay environment framework. It provides the ideal viewport tracking system to build upon for future shooting loops, platforming puzzles, or interaction triggers.
Save your project configurations, load up your level workspace tools, adjust your tracking sensitivity variables, and keep building!
👉 Download the 3D Character Controller & Mouse Look Unity Package Here