
Bringing Your Monsters to Life:
Now that you have your static low-poly character models sitting in your project scene layout, it’s time to make them move! Having a great 3D model is only half the battle; writing animations from scratch can take hours of tedious keyframing. Today, we are diving into an absolute game-changer workflow: Adobe Mixamo. You will learn how to take your free low-poly zombie model, upload it to Mixamo’s online auto-rigger, apply a creepy animation, and bring it perfectly back into Unity.
Step 1: Uploading and Auto-Rigging in Mixamo
Mixamo requires a clean 3D mesh to map its skeletal bones correctly. Before you start, make sure you have your zombie model exported as an .fbx or .obj file.
- Go to Mixamo.com (log in or create a free Adobe account).
- Click the Upload Character button on the right side of the screen.
- Drag and drop your vampire model file into the upload window.
- Once the model loads in the preview window, the Auto-Rigger tool will appear. You will need to drag colored markers onto specific parts of your character’s body: Chin, Wrists, Elbows, Knees, and Groin.
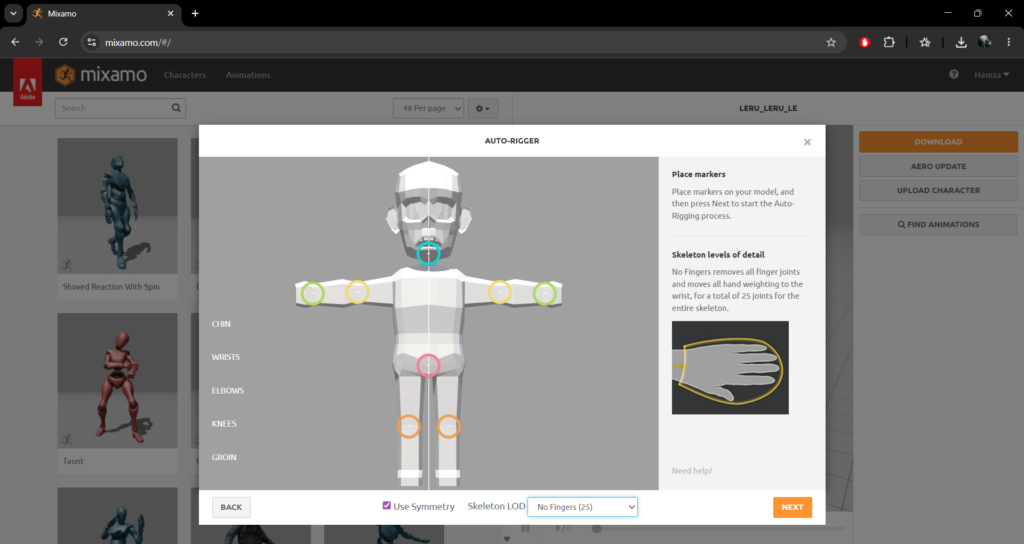
- Click Next. Mixamo will take a minute to process the geometry and calculate the skeleton structure. If it looks correct in the animated preview, hit Next again to bring it into your main dashboard!
Step 2: Choosing the Perfect Monster Animation
With your zombie successfully rigged, you can now browse Mixamo’s massive library of thousands of high-quality, professional motion-capture clips.
- Switch over to the Animations tab in the top navigation bar.
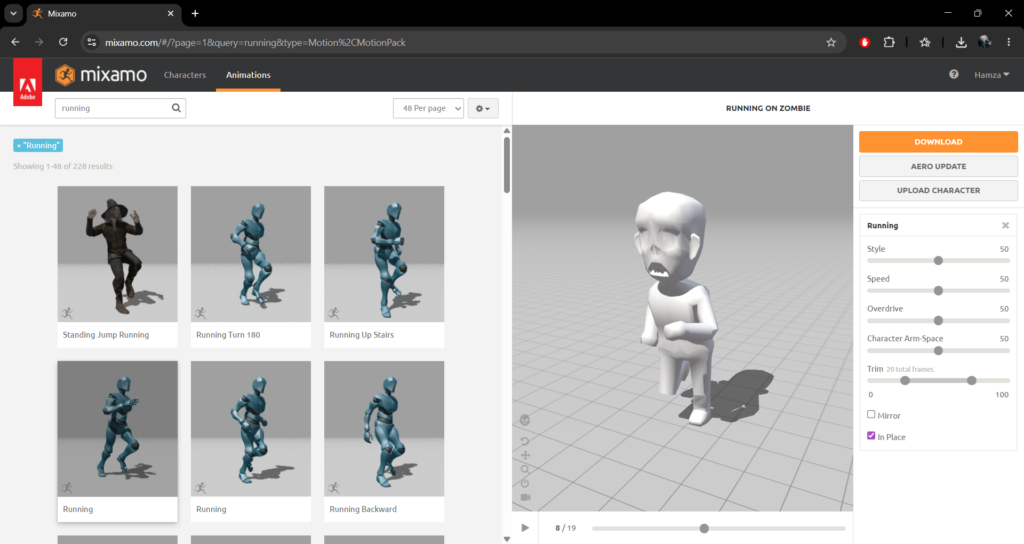
- Use the search bar to look for monster-appropriate movements. For a zombie, look up terms like “running” and check running in place field.
- Click on an animation card to view it instantly on your uploaded zombie model in the viewport.
- Use the sliders on the right-hand settings panel (such as Overdrive or Character Arm-Space) to fine-tune the speed and posture of the animation so it fits your low-poly style.
Step 3: Exporting the Animated Model
Once your zombie is moving exactly how you want, it’s time to download the file configurations for your game engine.
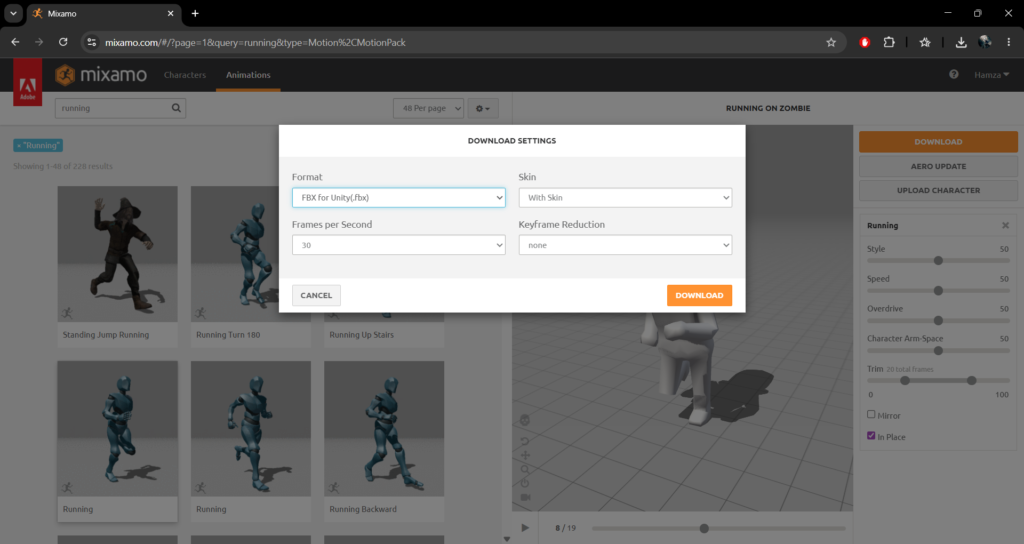
- Click the bright orange Download button in the upper right-hand corner.
- In the download settings popup, select the following configurations:
- Format: FBX for Unity (
.fbx) - Skin: With Skin (this ensures the 3D mesh stays attached to the moving bones)
- Frames per Second: 30 or 60 FPS
- Keyframe Reduction: None
- Format: FBX for Unity (
- Click Download to save the file to your computer.
Step 4: Importing and Setting Up the Animation in Unity
Now let’s head back into Unity to make sure the animation loops smoothly on your active game canvas layout.
- Import the File: Drag your newly downloaded animated
.fbxfile from Mixamo straight into your UnityAssets/Modelsfolder. - Hook Up the Animator: Drag your zombie model file up into the Hierarchy window to place it in your scene. If it doesn’t already have one, add an Animator component to it via the Inspector. Create an Animator Controller in your assets directory, add your Mixamo animation state to it, and assign it to your zombie’s Animator slot.
- Get the animation from the model: After creating the Animator, locate your model in the Project window and click the dropdown arrow to expand it. Select the animation clip—in this case, “Running”—and press Ctrl + D to duplicate it. This creates a standalone version of the animation that you can edit; ensure you check the Loop Time box in the Inspector. Finally, drag this duplicated animation into your Zombie Animator controller to complete the setup.
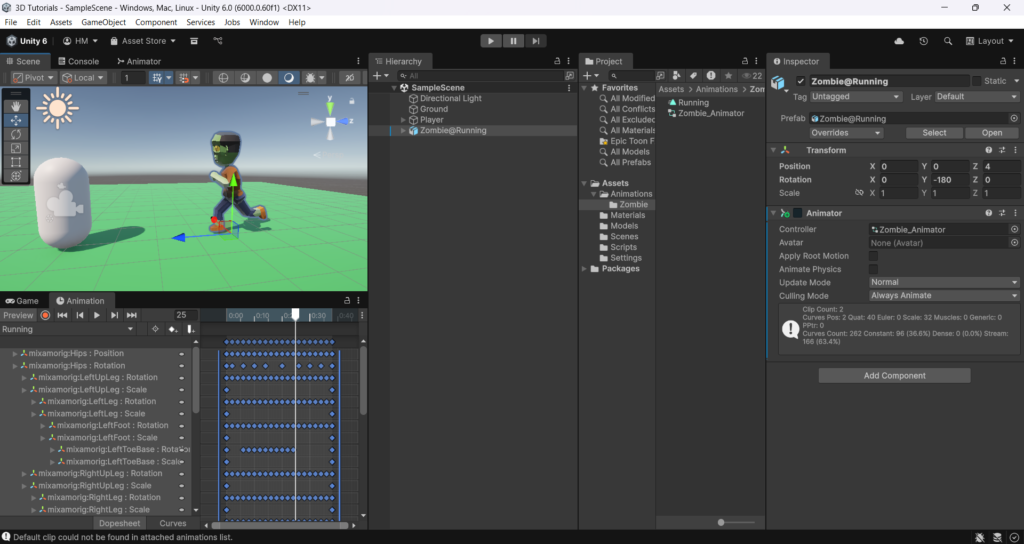
Hit Play in your editor window, and watch your zombie run in place, and now you can add more animations if you want and control them using the zombie animator!
⚠️ Common Pitfalls to Avoid
- The T-Pose Import Glitch: If your character’s limbs look twisted, distorted, or completely broken when playing the animation in Unity, double-check that the Rig tab is strictly set to Humanoid instead of Generic. Mixamo builds standard human skeletons, so mapping it as Humanoid forces Unity to read the joint data perfectly.
- The Character Walks Off-Screen (Root Motion): If your zombie physically walks forward during the preview loop but you want them to stay locked in place so your C# movement scripts can handle their speed, go to the model’s Animation tab in the Inspector, scroll down to Root Motion Node, and check Bake Into Pose for your Position and Rotation tracks.
Wrap Up
Utilizing the Mixamo pipeline completely bypasses the hardest parts of 3D character animation, giving indie developers the ability to build lively, moving game worlds in mere minutes. Rig your models, grab your favorite movement sets, and build your monster horde!