
Complete Movement, Jump, and Mouse Look Tutorial in Unity
Setting up a smooth first-person controller from scratch can be tricky. Getting the camera to clamp correctly without twisting upside down, handling diagonal movement normalization, and calculating clean gravity values often introduces frustrating bugs.
To give you a perfect, out-of-the-box system, this guide provides a fully production-ready 3D Character Controller and a Mouse Look scripting setup. We have integrated a unified, physics-backed jumping formula directly into the locomotion logic so your player can seamlessly walk, look around, and jump across platforms without any stuttering or floaty physics!
🛠️ Step 1: Setting Up Your Player Hierarchy Structure
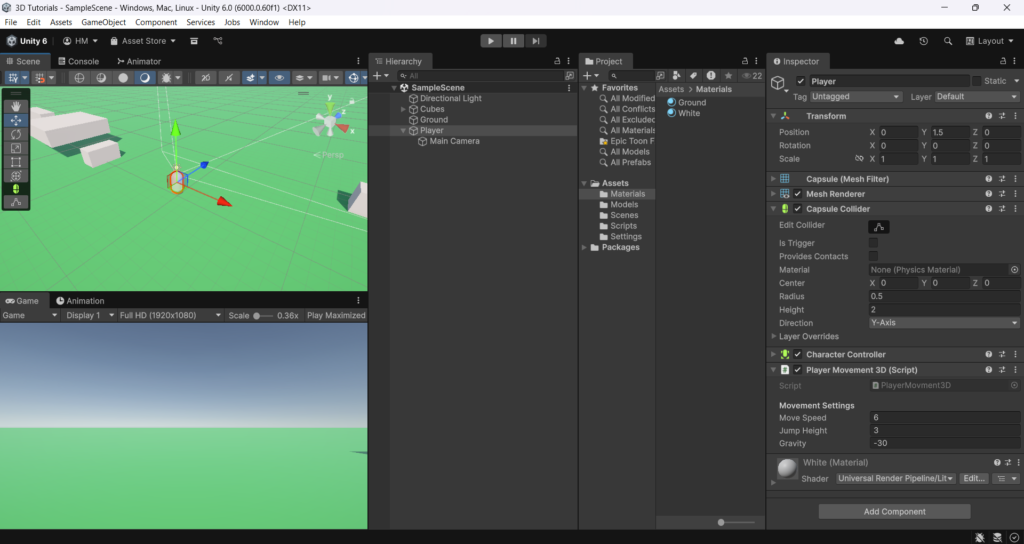
For a first-person perspective to function accurately, the Main Camera must turn dynamically with your player’s horizontal mouse inputs while handling vertical looking independently. Arrange your objects in the Hierarchy panel exactly like this:
- Create the Player Root: Right-click your Hierarchy panel, select Create Empty (or create a Capsule 3D object), and name it
Player. - Add Physics Components: Attach a Character Controller component directly onto this
PlayerGameObject. - Nesting the Camera: Drag your scene’s Main Camera inside the Hierarchy and drop it directly inside the
Playerobject, making it a child. Set its Transform position coordinates to(0, 0.8, 0)so it sits at the character’s eye level. - Attach the Scripts: * Attach the
PlayerMovement3D.csscript directly onto your parentPlayerobject.- Attach the
MouseLook.csscript directly onto your nested Main Camera child object.
- Attach the
🛠️ Step 2: Wiring the Unity Inspector Slots
Once your scripts are attached to their respective objects, link their internal property slots together inside the Unity Inspector window:
- Select your Main Camera child object in the hierarchy.
- Locate the Mouse Look script component in its inspector layout.
- Drag your parent Player GameObject from the hierarchy panel and drop it directly into the empty Player Body variable slot. This allows the camera’s horizontal mouse axis changes to rotate the entire character body dynamically!

📋 The Full Production Scripts (Ready to Use)
Create these two C# scripts inside your project folder and copy-paste the final, fully integrated codebase:
1. PlayerMovement3D.cs
C#
using UnityEngine;

[RequireComponent(typeof(CharacterController))]
public class PlayerMovement3D : MonoBehaviour
{
    [Header("Movement Settings")]
    [SerializeField] private float moveSpeed = 6f;
    [SerializeField] private float jumpHeight = 3f; // The peak height of your jump in meters
    [SerializeField] private float gravity = -30f; // Snappy downward drop rate (prevents floating!)

    private CharacterController controller;
    private Vector3 velocity;
    private Vector2 inputDirection;

    void Start()
    {
        // Grab the Character Controller component attached to this capsule
        controller = GetComponent<CharacterController>();
    }

    void Update()
    {
        // 1. Gather inputs from WASD or Arrow keys
        inputDirection.x = Input.GetAxisRaw("Horizontal");
        inputDirection.y = Input.GetAxisRaw("Vertical");

        // 2. Calculate local move direction relative to where the player faces
        Vector3 move = transform.right * inputDirection.x + transform.forward * inputDirection.y;
        move.Normalize();

        // 3. Scale horizontal movement by speed
        Vector3 finalMovement = move * moveSpeed;

        // 4. Grounded check to reset downward momentum forces
        if (controller.isGrounded && velocity.y < 0)
        {
            velocity.y = -2f; // Snaps the player to the ground
        }

        // 5. JUMP MECHANIC: Check if space is pressed while touching the floor
        if (Input.GetButtonDown("Jump") && controller.isGrounded)
        {
            // Physics formula: v = sqrt(h * -2 * g)
            velocity.y = Mathf.Sqrt(jumpHeight * -2f * gravity);
        }

        // 6. Apply constant downward gravity acceleration over time
        velocity.y += gravity * Time.deltaTime;

        // 7. Combine horizontal movement and vertical velocity into the final vector
        finalMovement.y = velocity.y;

        // 8. THE CRITICAL FIX: One single Move call handles everything flawlessly!
        controller.Move(finalMovement * Time.deltaTime);
    }
}
2. MouseLook.cs
C#
using UnityEngine;

public class MouseLook : MonoBehaviour
{
    [Header("Sensitivity Settings")]
    [Tooltip("Adjusts how fast the camera moves with your mouse cursor.")]
    [SerializeField] private float mouseSensitivity = 500f;

    [Header("Target Body Reference")]
    [Tooltip("Drag the parent Player GameObject transform layout into this slot.")]
    [SerializeField] private Transform playerBody;

    private float xRotation = 0f;

    void Start()
    {
        // Lock the hardware cursor to the center of the game screen overlay window
        Cursor.lockState = CursorLockMode.Locked;
        // Make the cursor invisible so it doesn't clutter up the gameplay view
        Cursor.visible = false;
    }

    void Update()
    {
        // Gather raw mouse movement axis deltas
        // Time.deltaTime ensures look speed feels identical regardless of your frame rate
        float mouseX = Input.GetAxis("Mouse X") * mouseSensitivity * Time.deltaTime;
        float mouseY = Input.GetAxis("Mouse Y") * mouseSensitivity * Time.deltaTime;

        // Decrease or increase the look tracker angle based on vertical mouse data
        xRotation -= mouseY;

        // CRITICAL: Clamp the rotation so the player cannot flip their head upside down!
        xRotation = Mathf.Clamp(xRotation, -90f, 90f);

        // Apply local rotation coordinates exclusively to the camera for looking up/down
        transform.localRotation = Quaternion.Euler(xRotation, 0f, 0f);

        // Rotate the entire player body transform left and right based on horizontal mouse movement
        playerBody.Rotate(Vector3.up * mouseX);
    }
}
⚠️ Common Pitfalls to Avoid
- Double Speed Diagonal Glitch: Inside Step 2 of the movement script,
move.Normalize()is critically important. Without this line, walking diagonally combines both horizontal inputs, making the character run $\approx 41\%$ faster. Normalization guarantees uniform speed across all input directions. - The “Two-Call” Jump Bug: Calling
controller.Move()multiple times in a single frame breaks the internal grounding flags. By compiling our horizontal walking values and our vertical jump physics into a singlefinalMovementvector, we ensurecontroller.isGroundedstays perfectly accurate. - Camera Floating Disconnect: If your capsule moves around the level but your camera viewpoint stays frozen in mid-air at the spawn zone, double-check your nesting setup. The Main Camera must be a direct child object of your primary Player transform layout to travel along with it.
Wrap Up
With your first-person mouse look clamped cleanly, input vectors normalized for fair movement, and a high gravity variable tracking physics vectors smoothly, you have a crisp, heavy, and incredibly responsive character controller! Link up your body transforms in the inspector layout, drop the scripts into place, and start building your game worlds!