
Movement in Unity: A Beginner’s Guide
Welcome back to BuildWithUnity! Now that we’ve mastered moving sprites in a 2D plane, it’s time to take our next big step into game development: the third dimension.
If you browse through code repositories or look under the hood of most 3D Unity games, you’ll quickly notice that 3D movement introduces a few extra layers of math—like dealing with $X, Y,$ and $Z$ axes, and handling camera orientation. If you’re new to 3D, seeing things like TransformDirection or Vector3 can feel a bit daunting. But just like 2D, once you break down the physics and input logic into a clear formula, it clicks instantly. Let’s get your character stepping into a 3D world.
The Character Controller: The What and Why
In 2D, we relied heavily on a Rigidbody2D combined with velocity. While you can use a regular 3D Rigidbody for 3D characters, Unity provides a dedicated, highly powerful component specifically built for this job: the Character Controller.
So, why use a Character Controller instead of a standard rigid physics body?
- A standard Rigidbody reacts to every single physical force in the engine—it can slide down slopes unintentionally, bounce weirdly off walls, or tip over when walking into a corner.
- The Character Controller gives you a robust, capsule-shaped collider that behaves exactly how video game players expect a human character to behave. It allows you to easily step up stairs, slide smoothly along walls, and handle slopes perfectly, while giving your script direct, absolute control over the movement vector.
Step 1: Setting up the 3D Scene
Before we touch the script, let’s build a quick environment layout inside the Unity Editor so our character has a world to move around in.
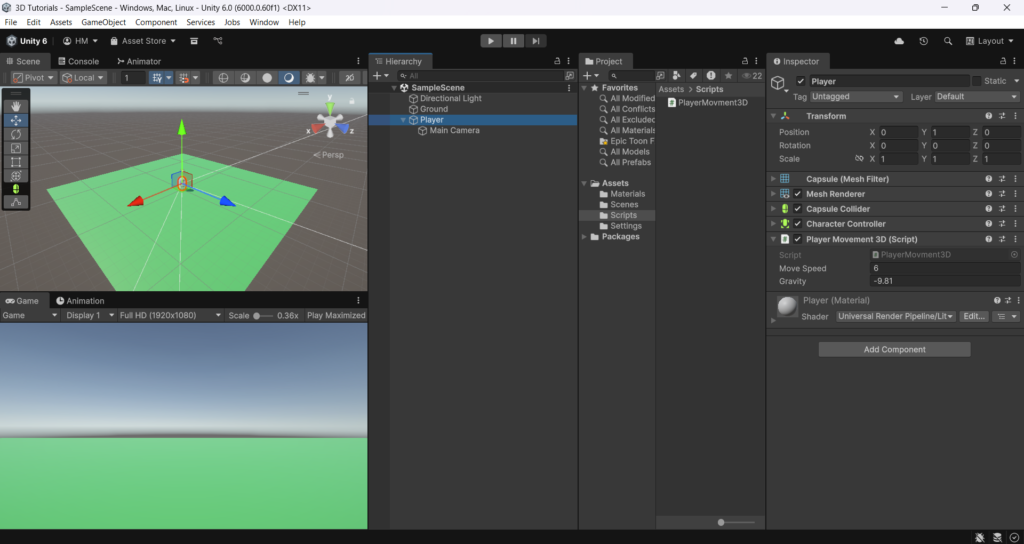
- Create the Ground: Right-click in your Hierarchy window, go to 3D Object > Plane. Name this
Groundand ensure its Position scale is set to(3, 3, 3)in the Inspector. - Create your Player: Right-click in the Hierarchy again, go to 3D Object > Capsule. Name this object
Player. - Position the Player: Move your
Playercapsule up slightly so it is standing on the plane (set its Position to something like(0, 1, 0)). - Add the Controller: With the
Playerselected, click Add Component in the Inspector and look for Character Controller. (Note: You can remove the default “Capsule Collider” component now, as the Character Controller has its own built-in capsule bounds!) - Setting the camera: Make your Main Camera a child of the player and set its Position to
(0, 0, 0).
Step 2: Writing the 3D Movement Script
Now, let’s write a script that takes our keyboard inputs and translates them into smooth 3D movement relative to the direction the player is facing.
Right-click in your Project window, select Create > C# Script, and name it PlayerMovement3D. Open it up and paste this clean, well-commented code template:
C#
using UnityEngine;

public class PlayerMovement3D : MonoBehaviour
{
    // Movement configurations editable in the Unity Inspector
    [SerializeField] private float moveSpeed = 6f;
    [SerializeField] private float gravity = -9.81f;

    // Component references and tracking variables
    private CharacterController controller;
    private Vector3 velocity;
    private Vector2 inputDirection;

    // Start is called before the first frame update
    void Start()
    {
        // Grab the Character Controller component attached to this capsule
        controller = GetComponent<CharacterController>();
    }

    // Update is called once per frame. Essential for responsive keyboard checks.
    void Update()
    {
        // 1. Gather inputs from WASD or Arrow keys
        // Horizontal maps to X axis (Left/Right), Vertical maps to Z axis (Forward/Backward)
        inputDirection.x = Input.GetAxisRaw("Horizontal");
        inputDirection.y = Input.GetAxisRaw("Vertical");

        // 2. Calculate the local move direction based on where the player faces
        Vector3 move = transform.right * inputDirection.x + transform.forward * inputDirection.y;

        // Normalize the vector so diagonal movement isn't accidentally faster
        move.Normalize();

        // 3. Move the character using the controller component
        controller.Move(move * moveSpeed * Time.deltaTime);

        // 4. Apply a simple custom gravity calculation to keep the player grounded
        if (controller.isGrounded && velocity.y < 0)
        {
            // Reset downward force slightly when touching the ground
            velocity.y = -2f;
        }

        // Apply constant downward gravity pull over time
        velocity.y += gravity * Time.deltaTime;

        // Move the controller down based on our gravity velocity tracking
        controller.Move(velocity * Time.deltaTime);
    }
}
Breaking Down the Code Formula
Let’s dissect the core concepts that make 3D space different from 2D:
- The Third Dimension ($Vector3$): In 2D, we only worried about $X$ (horizontal) and $Y$ (vertical). In 3D, $X$ represents strafing left/right, $Y$ represents jumping/gravity, and $Z$ represents moving forward and backward.
transform.forwardandtransform.right: If we just moved our character along the world’s global grid coordinates, pushing “W” would always move the player toward the world’s North pole, even if the player turned around to face South! By multiplying our inputs bytransform.forwardandtransform.right, we ensure that pushing “W” always moves the character forward relative to whichever way its capsule face is looking.
Common Pitfalls to Avoid
Keep these common 3D engine quirks in mind to save yourself a ton of troubleshooting time:
- Double Gravity Bug: If you accidentally leave a regular
Rigidbodycomponent attached to your player alongside theCharacter Controller, they will fight each other for control. The physics system will pull the character down while the controller tries to handle movement vectors, causing massive jittering. Stick to just the Character Controller for players! - The Diagonal Speed Boost: When a player presses both “W” and “D” at the same time, their input values combine. Without the
move.Normalize()line in our code, moving diagonally would make your character travel roughly $1.4$ times faster than moving straight ahead! Normalizing sets the vector length to a clean maximum of1.
Wrap Up
Save your project files, jump back into the editor screen, and drag your new PlayerMovement3D script component directly onto your capsule player. Press that top Play interface button, and use your WASD keys. You are now navigating a 3D coordinate space!
From here, you can easily pair this script layout with a mouse rotation logic to create a proper first-person perspective. Step back into your editor workspace and keep building!