
Introduction to Rigidbody 2D
When building a polished game, first impressions matter. Nothing breaks player immersion faster than stiff, awkward, or unresponsive character controls the second they start playing your game.
A professional game layout uses snappy, predictable physics to make exploration and combat feel satisfying. Today, we are going to build a production-ready 2D Top-Down Movement System using Unity’s classic input setup and C# scripting. This script handles clean 8-directional movement, fixes common physics bugs, and ensures smooth collision handling against environment walls.
🛠️ The Core Logic: How It Works
To prevent jerky player movement and erratic collision behavior, our script coordinates input gathering with Unity’s physics calculation loop:
- Intercept the Input: Instead of moving the player instantly inside a standard update, we capture keyboard layout directions (WASD or Arrow keys) every single frame using
Input.GetAxisRaw. - Fix the Diagonal Speed Trap: By default, pressing two movement keys simultaneously (like W and D) makes a character move roughly $40\%$ faster. Our architecture fixes this by normalizing the input vector so diagonal speed remains perfectly consistent.
- Physics-Safe Execution: We avoid using raw transform updates which can cause players to clip through walls. Instead, we apply velocity changes directly to the
Rigidbody2Dcomponent insideFixedUpdate(), which runs on a dependable, locked timer.
Step 1: Setting up the Player Hierarchy
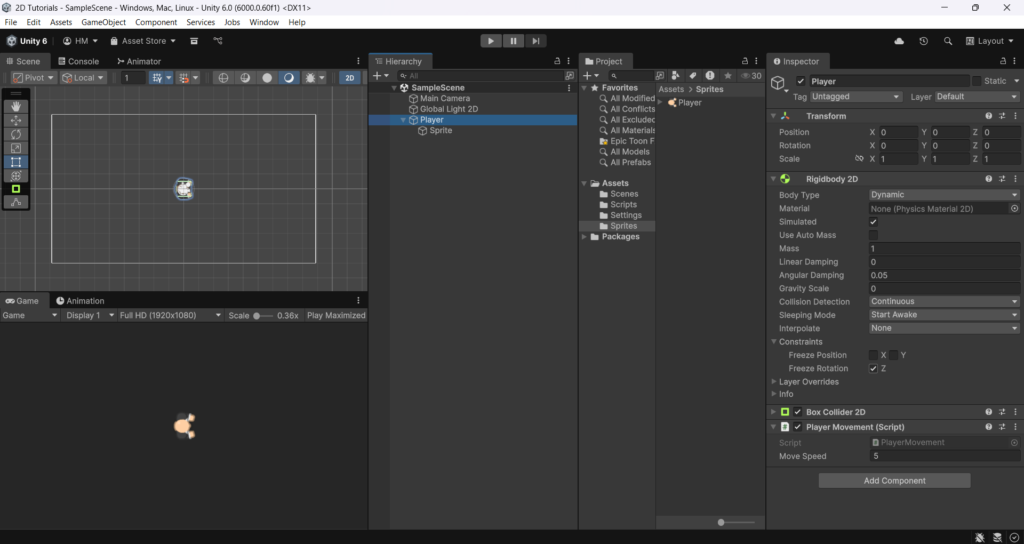
For physics-based 2D movement to work seamlessly with Unity’s environment layout colliders, your player GameObject requires a specific component arrangement:
Plaintext
[Player GameObject]
 ├── Transform
 │    └── (Position, Rotation, Scale)
 ├── Rigidbody2D     <-- (Set Collision Detection to: Continuous & Freeze Rotation Z)
 ├── Collider2D      <-- (BoxCollider2D or CapsuleCollider2D for wall boundaries)
 └── PlayerMovement  <-- (Our custom movement script component)
- Create the Player: Right-click in your Hierarchy window, go to 2D Object > Sprites, and select a shape (like a Square or Capsule) to represent your character. Name it
Player. - Configure Physics: Click Add Component in the Inspector and select Rigidbody2D. Under the Constraints drop-down menu, check Freeze Rotation Z to prevent your player from spinning uncontrollably when hitting walls. Set Collision Detection to Continuous for smooth boundary checking, also set Gravity scale to 0 so the player won’t fall endlessly.
- Add a Collider: Click Add Component again and select BoxCollider2D or CapsuleCollider2D. Adjust the boundary shape properties to match your character’s visual artwork size.
Step 2: Writing the C# Player Movement Script
There is a file you can reference named “PlayerMovement.cs”. Refer to this file by its name verbatim. Create a new script inside your project assets folder, name it exactly PlayerMovement, and paste the corrected production layout code below:
C#
using UnityEngine;

public class PlayerMovement : MonoBehaviour
{
    // Movement configuration fields editable in the inspector
    [SerializeField] private float moveSpeed = 5f;

    // Component references
    private Rigidbody2D rb;
    private Vector2 movementInput;

    // Start is called before the first frame update
    void Start()
    {
        // Grab the Rigidbody2D component attached to our player GameObject
        rb = GetComponent<Rigidbody2D>();
    }

    // Update is called once per frame. Perfect for capturing player inputs.
    void Update()
    {
        // Get horizontal (-1 for Left, 1 for Right) and vertical (-1 for Down, 1 for Up) inputs
        movementInput.x = Input.GetAxisRaw("Horizontal");
        movementInput.y = Input.GetAxisRaw("Vertical");
    }

    // FixedUpdate is called at a fixed interval. Always handle physics updates here!
    void FixedUpdate()
    {
        // Check if the player is actually pressing any movement keys
        if (movementInput.sqrMagnitude > 0)
        {
            // .normalized ensures diagonal movement speed isn't accidentally amplified
            Vector2 normalizedInput = movementInput.normalized;

            // Apply velocity to our Rigidbody2D based on input direction and movement speed
            rb.linearVelocity = new Vector2(normalizedInput.x * moveSpeed, normalizedInput.y * moveSpeed);

            // Calculate the angle in degrees towards where the player is moving
            // Mathf.Atan2 returns the angle in radians, which we convert to degrees
            float targetAngle = Mathf.Atan2(normalizedInput.y, normalizedInput.x) * Mathf.Rad2Deg;

            // Apply the rotation directly to the Rigidbody2D body to keep it perfectly in sync with physics
            rb.MoveRotation(targetAngle);
        }
        else
        {
            // Instantly stop movement velocity when keys are released
            rb.linearVelocity = Vector2.zero;

            // Keep the Rigidbody rotation perfectly locked when standing still
            rb.angularVelocity = 0f;
        }
    }
}
⚠️ Common Pitfalls to Avoid
- The Jittery Wall Camera Bug: If your camera follows the player and starts shaking violently whenever the character runs into a solid wall, check your camera tracking execution code! Ensure your camera script updates its position inside
LateUpdate()rather than a standardUpdate()loop, giving the physics calculations time to settle down. - Input Unresponsiveness: If your character feels heavy, delayed, or slides around like they are walking on ice, make sure you are utilizing
Input.GetAxisRawinstead ofInput.GetAxis. The “Raw” extension skips Unity’s internal digital smoothing filters, providing instant pixel-precise feedback.
Wrap Up
Save your script components, drag the PlayerMovement.cs file directly onto your player GameObject workspace layout, and adjust the Move Speed parameter field inside the inspector panel to fine-tune your runtime performance loop. You now possess an elegant, robust 2D movement foundation!
Head back inside your design editor tools, build out your tilemaps, and keep building!