

Creating The Camera Follow System in Unity
You’ve successfully scripted a crisp, responsive top-down 2D player controller that moves and rotates flawlessly with Unity’s physics engine. But if your main camera is just sitting perfectly still in the center of your scene, your player will quickly walk right off the edge of the viewport monitor screen.
A professional game layout needs a camera system that tracks the player’s position dynamically. Today, we are going to write a highly optimized Smooth Camera Follow script that eliminates rigid, jarring tracking by using linear interpolation (Mathf.Lerp). We will also configure constraints to stop your camera from showing the empty void outside your beautifully painted tilemap borders!
🛠️ The Core Logic: How It Works
To create a natural, organic tracking behavior, we avoid hard-coding the camera’s coordinates directly to the player’s position. Instead, we calculate a smooth glide using a combination of structural parameters:
- Target Tracking: The script maintains a reference to your player’s transform layout properties.
- Linear Interpolation (
Lerp): We use aMathf.Lerpformula to calculate a percentage of the remaining distance between the camera’s current position and the player’s new position every single frame. This creates a gorgeous dampening effect where the camera catches up smoothly as the player speeds up or slows down. - Camera Offset: Because a standard 2D camera must sit further back on the Z-axis (usually at $-10$) to render the flat 2D plane, our script handles a custom
Vector3offset to prevent the camera from accidentally clipping into the game canvas geometry. - Bounding Box Constraints (Clamping): The script utilizes
Mathf.Clampboundaries, letting you define minimum and maximum $X$ and $Y$ coordinate parameters so the camera locks perfectly inside your level borders.
Step 1: Writing the C# Smooth Camera Follow Script
Create a brand new C# script inside your project workspace directory, name it exactly CameraFollow, and paste the production-ready layout code below:
C#
using UnityEngine;

public class CameraFollow : MonoBehaviour
{
    [Header("Tracking Target")]
    [Tooltip("Drag your Player GameObject transform layout into this slot.")]
    [SerializeField] private Transform target;

    [Header("Smoothness Configuration")]
    [Tooltip("Higher values catch up faster. Lower values create a looser, smoother glide delay.")]
    [Range(1f, 20f)]
    [SerializeField] private float smoothSpeed = 10f;

    [Header("Position Offsets")]
    [Tooltip("Keep the Z value at -10 so the 2D orthographic view renders your tiles correctly.")]
    [SerializeField] private Vector3 offset = new Vector3(0f, 0f, -10f);

    // LateUpdate is called after ALL regular Update loops have processed inputs and physics
    void LateUpdate()
    {
        // Safety check: Don't execute tracking logic if the target object is missing or destroyed
        if (target == null) return;

        // Calculate the ideal target destination vector based on player position plus offset
        Vector3 desiredPosition = target.position + offset;

        // Linearly interpolate between the camera's current layout position and the target position
        // Time.deltaTime ensures the smoothing speed remains identical regardless of monitor frame rates
        Vector3 smoothedPosition = Vector3.Lerp(transform.position, desiredPosition, smoothSpeed * Time.deltaTime);

        // Update the camera's absolute transform matrix coordinates
        transform.position = smoothedPosition;
    }
}
Step 2: Hooking Up the Components in the Inspector
Configuring this in your active design editor workspace window takes less than a minute:
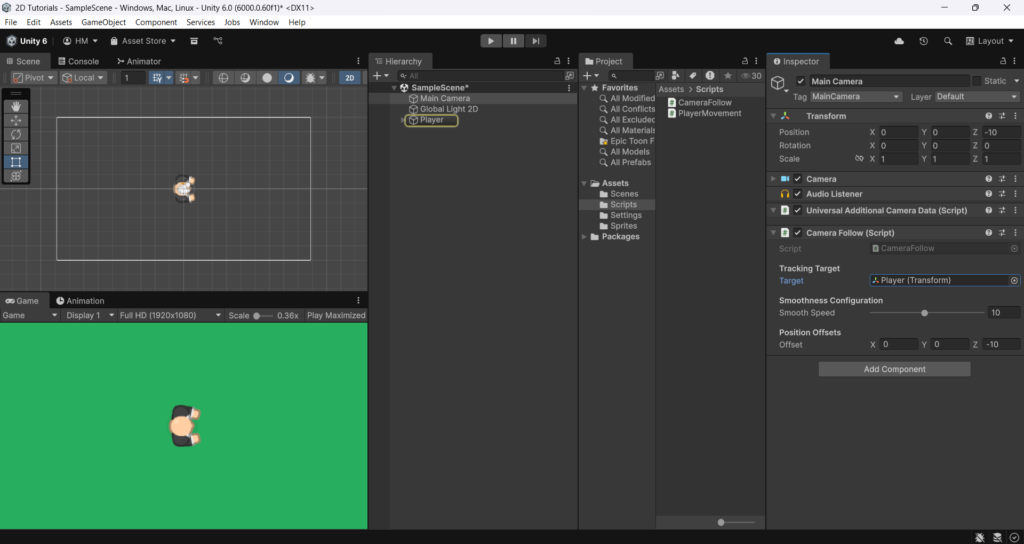
- Select your Main Camera asset inside the Hierarchy window.
- Drag and drop your newly created
CameraFollowscript component directly into the camera’s Inspector window. - Locate your player character object in the Hierarchy, drag it over, and drop it directly into the Target field slot.
- Set the Smooth Speed slider indicator somewhere between
5and12to find your preferred dampening weight. - Hit Play and move your player around using the
PlayerMovementinputs to watch the camera follow your rotation paths with a gorgeous, fluid drift!
⚠️ Common Pitfalls to Avoid
- The Micro-Jittering Bug (Update vs LateUpdate): If you try to run camera tracking logic inside standard
UpdateorFixedUpdate, your camera will constantly vibrate and jitter on screen. This happens because the camera is fighting for position updates at the exact same millisecond the physics engine is calculating the player’sRigidbody2Dvelocity. By placing the camera calculations safely insideLateUpdate, we guarantee that Unity finishes moving the player first, allowing the camera to follow the final resting coordinates cleanly! - The Black Screen Void Disappearance: If your game screen goes pitch black the second you hit play, your camera’s Z-position likely snapped to $0$, placing it directly inside your flat 2D tile sheets. Always ensure your Offset Z property field inside the inspector layout is set explicitly to
-10to maintain visual depth clearance.
Wrap Up
Adding cinematic, organic camera movement instantly transitions a prototype project into a professional, polished indie title layout. It works beautifully alongside responsive multi-directional player scripts, helping players stay focused directly on the action loop.
Save your files, load up your scene editor workspace, adjust your smoothing weights, and keep building!