
Master Infinite Depth:
Flat, static backgrounds can make a 2D side-scroller or platformer feel rigid and lifeless, stripping away the magic of exploring a vibrant world. To instantly add cinematic depth to your project, developers use Parallax Scrolling—a technique where background layers move slower than the foreground, tricking the player’s eyes into perceiving an endless 3D horizon on a flat 2D canvas.
To help you implement this effect seamlessly, we have put together a complete, production-ready tutorial along with a downloadable Unity Project Template that is completely set up and ready to plug and play!
🛠️ The Core Logic: How Parallax.cs Works
Instead of just dragging layers around randomly, our template utilizes a highly optimized Parallax.cs script. Let’s break down the mathematical magic happening inside its execution loop:
- Tracking the Canvas Size: During
Start(), the script automatically measures the exact horizontal width of your background sprite usingGetComponent<SpriteRenderer>().bounds.size.x. This ensures you don’t have to guess or manually type in asset sizes. - The Relative Movement Calculation: Inside
FixedUpdate(), the script calculatesdist, which shifts the background layer’s $X$ position based on a fraction of the camera’s movement (cam.transform.position.x * parallexEffect). A effect value of0means the layer moves perfectly with the camera (acting like the sky), while a value closer to1keeps it moving fast like the foreground. - The Infinite Seamless Loop: The variable
temptracks how far the camera has moved relative to the layer’s starting point. If the camera passes the boundaries (temp > startpos + lengthortemp < startpos - length), the script instantly snaps thestartposforward or backward. This creates a flawless, endless looping background where your player can run forever without ever hitting an empty void!
Step 1: Setting Up Your Background Layers in Unity
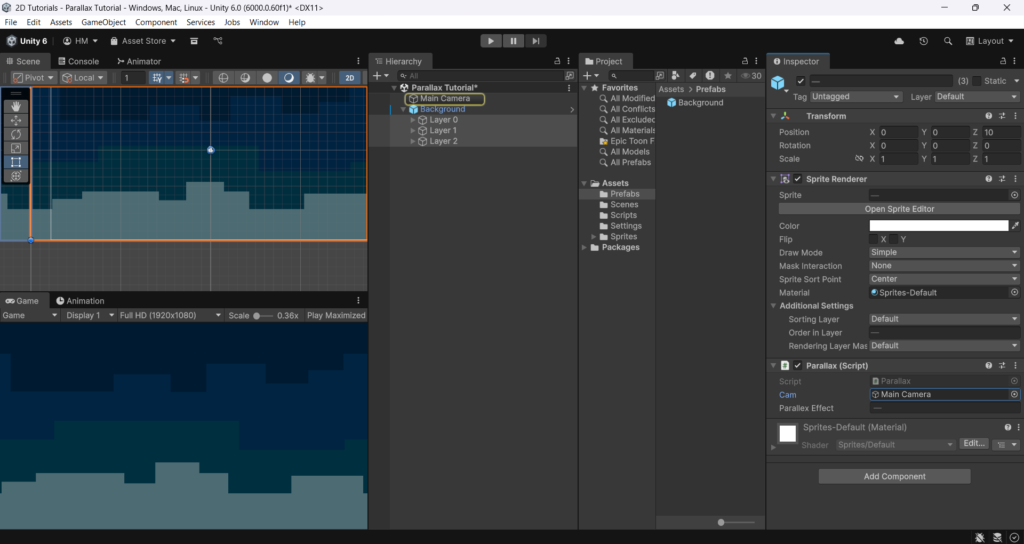
To get the absolute best visual results out of the script, your artwork layers must be structured properly inside your Unity scene hierarchy layout:
- Layer Your Sprites: Divide your background art into separate files (e.g., Sky, Distant Mountains, Near Trees). Drag them into your scene and assign them increasing Order in Layer numbers so they stack correctly (e.g., Sky = -10, Mountains = -5, Trees = -2).
- Duplicate for Seamlessness: For the looping logic to hide its texture snapping perfectly, your background sprites should ideally be tileable. Ensure their Draw Mode is set to Simple or Tiled so they have a clean edge footprint.
Step 2: Configuring the Component Script Parameters
Once your sprites are in the scene, assigning the tracking mechanics inside your active design inspector tools takes just a moment:
- Attach the
Parallax.csscript component directly to each separate background layer GameObject. - Select your Main Camera from the Hierarchy workspace and drag it directly into the script’s Cam field slot.
- Adjust the Parallex Effect slider variable to set the depth weight:
- Layer 0: Set the effect to
0.1 (the background will stay perfectly locked with the camera). - Layer 1: Set the effect to
0.3(moves very slowly, feeling miles away). - Layer 2: Set the effect to
0.7(moves faster, closer to the player’s position).
- Layer 0: Set the effect to
Hit Play, move your character or camera controller around, and watch your flat graphics instantly transform into a sprawling, deeply immersive world!
⚠️ Common Pitfalls to Avoid
- The Jittery Layer Shake (Update vs FixedUpdate): If your background layers shake or vibrate violently when the camera moves, it means your camera script is calculating its position inside a different frame loop. Our
Parallax.cshandles positioning insideFixedUpdate. Ensure that your camera controller script or physics-based character movement is also executing smoothly withinFixedUpdateor utilizing proper interpolation to eliminate display stutter completely. - Mismatched Sprite Textures: If you notice a visible gap or jarring line when the background loops, open your asset texture properties in the Inspector and make sure the Wrap Mode is set to Repeat and the sprite bounds mesh width covers enough area to mask the shift.
Wrap Up
Implementing an organic parallax movement completely changes the premium feel of a 2D indie title, moving it away from a basic hobby project and into a polished, commercial art experience.
To save you time drawing assets and linking scripts manually, we’ve packaged the source code, pre-configured scene layers, and camera parameters into a single, downloadable package slot. Grab the template below, drop it into your project folder directory, and start building!
👉 Download the Ready-to-Use 2D Parallax Template Unity Project Here!